Monday, January 27, 2020

New Website: No, We Haven’t Flown the Coop


Hum Bird on linen with Japanese Boro Style Stitching.
No, we haven’t left or closed down. But after procrastinating for the past couple of years, we have finally created a new website. Thank you all for your patience during this transition! The new site is now up and running.

The website address is the same: www.sproulestudios.com

The new Blog is part of the new websiteNew Blog

The email is different, and you can contact us through the Contact Us  page. 

New blog posts will be posted on the Website Blog, and the new blog will be up in a few days. We will be featuring more How To Tutorials on the new blog.
Things have been moved around a bit, but we still carry the same products, and we are adding new things every day. We hope you will find the new site much more user friendly and informative. Thank you to all of our loyal customers.
Note: It will take the search engines a while to relink to the new sections of the website, but just enter the site address and you will find everything up online.

Tuesday, December 10, 2019

Another Hand Stitched Story


   I wanted to make a piece using these two photos of my son Tyler and his girlfriend Carly I took last summer in New Mexico. The first image is a doorway in Socorro, NM, and the second is an overlook of the Rio Grande Gorge near Taos, NM.
 The title of this piece is What's Next?


   I printed the door image on Jacquard's regular inkjet Printing Cotton, and the second image was printed on Jacquard's Extrav-Organza silk organza. I printed the images on my small desktop Epson ET 3750 inkjet printer. Both  fabrics have a freezer paper like backing so they feed pretty easily through the printer without jamming. I selected a regular print and paper setting on the printer. I did test runs with these papers previously, so I sort of knew what to expect. The prints were a bit on the light side, but the color reproduction was fairly accurate. I printed two of the silk organza images as it was pretty hard to see the print when placed on top the door image.

   I tried a couple of different layouts and decided I liked the second layout more. I am not sure that old teabag would have added a whole lot to the composition, so I tossed it out. Next came the hard part: figuring out how in the world to pull this all together. I started basting my pieces together, and added solid colored cotton behind the figures to make them more visible.


After finishing part of the hand stitching, I used my iPad, Apple Pencil, and the Adobe Sketch app to figure out the designs for the rest of the stitching. This process makes it so easy to visualize what it might actually look like. I used DMC  and Weeks Dye Works cotton floss for all the hand embroidery.


Finished 10" x 12"

Take a look at that hair: 1 strand at a time!

Wednesday, June 19, 2019

Experimentation with Hand Embroidery and Heat-Away Stabilizer


Finished. I accomplished what I set out to do, and I learned what to do and what not to the next time around.
   I am working on a new little piece to try out some new techniques and materials. The size of this piece is 8.5” square.
   Below is a section of the background I made from layering torn strips of cotton and silk. After basting down the strips, I stitched the layers together using a simple Japanese Boro, or mending, style  of stitching. This is just a simple running stitch.
    Once you wash the organza, it loses quite a bit of its body, and it becomes a bit too soft for this particular use.
   
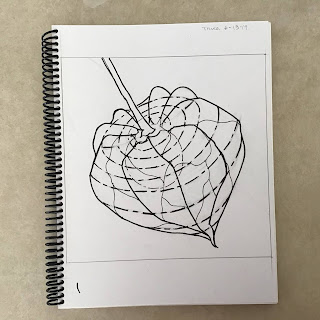
I have done a rough sketch of my image, a Chinese Lantern pod, and I outlined the drawing with black ink to simplify it and make it easier to trace.


   The stabilizer I am trying out is Sulky Heat Away Clear Film that I found on Amazon.


    I traced my image on to the stabilizer with a Fine point Sharpie. The instructions with the stabilizer say not to use a Sharpie, and I understand that in the process of heating the stabilizer to dissolve it, there is a danger the ink might transfer to your fabric or thread. The instructions recommend using a Frixion type pen that is removed when applying heat, but I found the marks really hard to see.
    I did a test sample first, and I did not have that problem with the ink transferring. I would absolutely recommend that you do a test sample with your fabric, choice of marker, and thread before doing work of this nature on an actual piece.

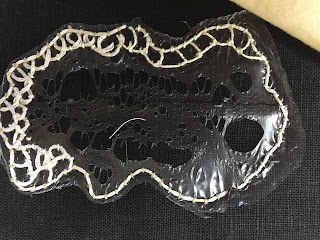
   I worked a few sample stitches first with a couching stitch to outline the shape and some needle weaving stitches to fill the area in. Once I had enough stitches to experiment with, I applied the heat with my iron on a high setting. I was pretty hesitant to iron over this plastic like substance with my brand new iron, but it actually turned out to be just fine.
   You can see the film beginning to melt away with the application of the heat. And in the image below, you can see there are little bits of the film stuck in the really closely stitched areas. But, almost all of the film actually dissolved.

   In my final review of this product, I am going to give it a try on my actual small project where I need something to stabilize the very open stitching. If I was working on something with very dense stitching, I probably would not choose this product as I might not be able to remove it all.
   Now all I need to do is figure out this needle weaving thing, and then I can finish my little project. I am really glad I decided to experiment with a really small piece before tackling something much larger and more involved using these same or similar techniques!

Here the main areas of the lantern have been outlined using couching with 4 strands of DMC cotton floss.
 Final Decision:
  I would not use this product again. As you can see in the previous image, there were some little bits of stabilizer that remained under the denser stitching. I could not get rid of these. On my final project, it took me ages to get rid of all those nasty little bits. 
   Sometimes all you learn when trying something new is that you will never, ever attempt that again. That is what I learned, so I hope you can benefit from my little experiment!

Wednesday, May 15, 2019

Workshop: Feathers, Ferns, and Furls

On July 12-13, 2019, I will be a teaching a two day in depth version of this class at Village Sewing in Santa Rosa, CA. All work is done on your regular domestic machine.

 In my machine quilting career, I have created just about every shape you could possibly imagine. One design tendency I have for quilting is to choose one or two motifs or designs, and then I do multiple variations of those designs throughout the quilt.
   That is why the information included in this workshop is so valuable. Many people think "drawing" is very intimidating and something beyond their reach or skill level. Almost everyone's first response to the word is that they can't draw, and they quickly retreat in the opposite direction.
I will take all the fear out of drawing for you.
   In this workshop I will share with you my foolproof method for drawing curves and quilting design variations of the Feathers, Ferns, and Furls to fill just about any space.

These are some of my fern designs. Look at how they pop on the black fabric.
Day One:
• Create amazing, foolproof curves to fit any
areas of your quilt.
• Fill any shapes with your designs.
• Learn stitching tips and optional sequences
to achieve immediate success.
• Practice with traditional feathers and learn
more contemporary designs as well.
These are the furls. Once you know how to draw the curves, you can do endless shapes and variations.

Day Two:
For more practice you can do any of the following,
with lots of help of course!
• Stitch the sampler pattern provided.
• Design and stitch your own original wholecloth
piece using the designs you have
learned.
• Quilt your own quilt or wallhanging in class
or just receive a consultation for quilting
ideas to be used later on.


This is my sampler in progress. It is all about technique, and you can do this too with a little practice.
   More than anything, I want you to look forward to quilting your work when you finish the piecing. I will help you get "unstuck" when it come to options for the quilting of your work.

Santa Clara: Contemporary Hand Embroidery Workshop

Irene Brummer

 Last October, I taught my Hand Embroidery workshop to the Santa Clara Valley Quilt Association in Santa Clara, CA. We had a packed class with 20 participants. The skill level ran the gamut from people who had been embroidering for most of their lives to those who had never done hand embroidery before.
   Everyone was remarkably patient and enthusiastic, and I was very happy to see all the finished samples entered in the guild's semi-annual show a couple of weeks ago.
Tracy Visher
  
   This piece was done by Tracy Visher of Sacramento, CA. Tracy made a whole set of pillows for her patio furniture, of which this is one. Tracy is a very accomplished stitcher who has been doing hand embroidery for years, so I was glad she enjoyed the class.


Mitsuko Sasaki
   This beautiful piece was done by Mitsuko Sasaki. She has done a marvelous job, and I love the additional edging she added to her piece.


Roberta Pabst

Betty Eastham
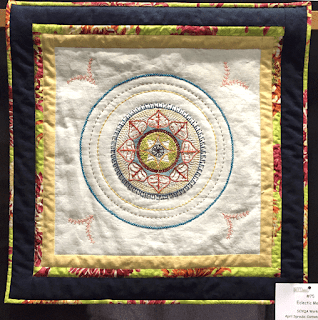
   I offer the option of doing this design in either the Bright or Neutral color palette. Roberta chose to do her piece in the neutral color palette. The neutrals really help you see the impact of values in your work. One thing that really makes mandala type designs 'pop" is the variation in value and the detail and scale of the shapes in each concentric row.


Sandra Crane

   And last of all, we have Sandra's lovely piece. I love the way everyone has put their own spin on this embroidery pattern. You can see what a difference the choice in colors and the variation in the fabric borders can make to the overall impact of the piece. Thank you everyone for sharing your work!
   I will also be teaching this workshop, Contemporary Hand Embroidery, at San Francisco School of Needlework and Design on August 24, 2019.

Friday, April 19, 2019

Working In a Series: Japanese Boro Stitching

   I have always admired artistic work done in a series. It is interesting to see where people started and what the initial impetus was,  where that initial piece of work led them, and what they gained from the experience. 
   I always seem to jump around a lot in the type of work I do. I am constantly looking, gathering ideas, being inspired, and wanting to try new things.
   But now, I really want to settle in and begin to explore things a little more in depth to see what I might possibly learn by working in a different manner. Instead of finishing a piece and instantly rushing into the next project on my design board, I want to slow down and more fully contemplate what value or lesson each piece holds.
   I think the biggest change over the years in the way I approach making my fiber art is to learn to completely enjoy the process.


I began with this one little sample of different fabrics appliqued onto a background of hand dyed navy and black fabrics. The linen patches are printed from hand carved stamps I have made. As I worked on this piece, I realized too late that I really liked the negative spaces without any stitching. My eyes beg for a quiet place to rest.


  So began my little series of four pieces. I will try to explore something different in each one. Maybe the next one will have only a few thoughtfully placed stitches in a very simple manner.

Japanese Boro stitching was common in 18th-19th century Japan as a way of mending worn clothes to make them last longer. It has become popular as an art form in itself these days.
   So, these are the parameters I used in setting this up:
- all pieces had to be the same size at 8.5" squares
- they had to be in 3 basic colors: black, red, and white but could include shades or tones of these colors
- the samples should include different textures and should include silk, cotton, and linen, but not necessarily all 3 fabrics in each piece
- I can only use one basic stitch: the running stitch.
   It is so much easier to prep all these pieces at once so I don't have to dig everything out again. That way I only have to clean up a big mess once. I am working on Sample #1 now. Sample #4 is finished.


    I have been doing lots of hand embroidery over the last four years or so. The funny thing is, the more hand stitching I do, the more I want to simplify my design aesthetic. The work is not at all about how complex, concentrated, or perfect the stitches are, but it is much more about the texture the stitches create on the fabric, the way they catch the light, and the way it feels in your hands.
   

Monday, March 11, 2019

The Blocking Process

   Over the past couple of months, I have been taking an online embroidery class. Although I have gotten really comfortable and confident in doing hand stitching without an embroidery hoop, I found that the hoop was an absolute necessity in experimenting with different needle weaving techniques.
  These types of stitches are done by running the thread vertically the length of the shape to form a weft. Then your stitches are formed over this structure while only attaching to the fabric at the edges of your shape. This can cause major distortion if you aren't using a hoop.


  Even when I finally resorted to using a hoop, I still had a lot of puckers in my fabric. I decided I really had to block my fabric to try and flatten things out a bit and eliminate the distortion.

   What you will need to do the blocking: a piece of foam core, sheet of plastic, spray bottle, and some straight pins.


  Begin by spraying your embroidered piece on the front until it is evenly moist, then flip it over to the back side and repeat the process. Let your piece rest for a couple of minutes so the water saturates and relaxes the fibers.


   Now, starting by pinning a corner of your fabric close to the corner of the foam core so you can use the board for reference to keep your piece straight.


   I know my square of fabric started out at 8" square. in some places it was 3/4" smaller, so I gently started stretching the fabric until I got a perfect 8" again. The moisture really relaxes the linen fibers, and as they dry the fiber tightens up again.
   Usually the fabric dries in a couple of hours when doing the blocking. But, because of the density of my hand stitching  I let it dry overnight.


You can see what a remarkable difference this process made. For me, the blocking is well worth the effort, and it only takes me a few minutes to do. Now my fabric lies nice and flat, and the dimension of my stitching shows up even more.
 

Thursday, January 10, 2019

Gratitude for Victor Thomas Jacoby Award Opportunities

Dec. 14, 2018, Award Ceremony at the Morris Graves Museum of Art with past and present recipients. I am the second shortest in the front row just to the right of center.
   Last November, I was notified that I had been selected as one the of the Victor Thomas Jacoby Award recipients along with Nancy Kennedy and Sandra Kernan. 
   Victor Thomas Jacoby was a Humboldt County, CA, textile artist who established this fund before his death in 1997. Victor, a talented hand weaver who exhibited his work throughout the US and Canada, struggled financially for much of his life. Near the end of Victor's life he received an inheritance from his family and set up this fund to help other artists expand their artistic horizons and achieve their goals. 
  In 2018, the award was open to hand weavers, dyers, and spinners of Humboldt County. My focus is on the development of hand dyeing techniques for linen to be used in fiber art collage work along with the exploration of old and new needle weaving techniques.
  Most of my funds will be used for educational opportunities that were not possible for me before.The funds will also allow me to set aside larger blocks of time to do more exploration and experimentation with new techniques and styles of mixed media textile art. I am incredibly grateful to Victor for setting up this fund and also to the selection committee who chose me as one of the 2018 recipients.
My revised dye calculations for a 3 step gradation. Easy, huh?
    The really wonderful thing is that this event has already prompted me to get back in to my dye studio. The other day I needed some light gray fabric for the binding of the Black Linen Tunic I am making. It has probably been two years since I last dyed any fabric. I managed to unearth all the binders of my dye notes, calculations, and samples. When I first looked at those pages, they might as well have been written in a foreign language. I thought, how could I know so much about a subject in the past and be so completely clueless about the process now?
Ready, set, dye!

  Thank goodness, it all came flooding back to me quickly as I pored over the pages. I did a simple three step gradation of a subtle gray color on Ultra Sateen cotton fabric and came up with exactly what I wanted. Just for fun, I threw in some scraps of linen to see how it took the dye: amazingly beautiful! I know this next year is going to be filled with incredible discoveries and opportunities as I forge ahead with and open heart and an open mind. 
End results. Darkest on left, lightest in center with linen strips on top, medium shade on right. Success.

Friday, December 07, 2018

Linen Tunic: My Garden

   A little bit of this, a little bit of that, and before you know it you have something wonderful, quite different, and really fun to wear. I have wanted to make one of the Japanese style aprons to wear as a tunic or top for quite some time. 
   My theme or story for this piece is my little front garden. It is quite wild and unruly, but it gives me a great deal of pleasure just to be there in the midst of the nasturtiums, ferns, and other growing things. Just as I no longer strive for perfection in my art, I have no desire to tame the great outdoors.


    After searching for ages, I finally came up with the closest pattern I could find to suit my needs; Simplicity #1133. This pattern had a huge dart along the side seam that I eliminated by pinning the edges of the dart together. I wanted to have one entire piece with no seams so I could freely paint and stitch away. It is made from the Natural Linen I carry in my shop.

   After sewing the garment together, my first step was to spray it with Jacquard's airbrush ink. After heat setting the ink, I started applying my nasturtium shapes and rectangular strips of fabrics. The flowers were glued on with a teeny bit of glue, and the rectangles were hand basted on. The last thing I want on a garment is a fusible that will be stiff and heavy feeling. 
 After machine stitching around the edges of the flowers and leaves, I painted in my moths with my Giant Moth Stencil using Neopaque and lumiere. Next came the really fun part as  I started drawing in the abstracted stem shapes for the hand embroidery to visually tie all the shapes together.


 I wanted to emphasize the edges of the garment, but I didn't want anything too fussy or exacting. I first worked a row for Cretan Stitch around the edges, then an irregular blanket stitch, and ended with short little stitches for just a little touch of added color. I found some beautiful old shell buttons that were just the right size for the tab closures at the shoulders.
  Detail of the stitching on the back.
   For the rectangular overlays, I used scraps of my hand dyed cotton. I love the way the fabric puckered up after washing to give it that beautiful bumpy texture. 
   Now I am getting ready to start another tunic. My next effort will be in black linen that will be cut on the bias, so it will be interesting to see how different the fit is. I am thinking rust tones,splashes of brilliant blues, and little bits of a lovely pearl gray hand dyed sateen. I haven't quite decided on a theme yet.

Thursday, December 06, 2018

A Valuable Resource: San Francisco School of Needlework and Design

   In recent months, a new business has been brought to my attention: the  San Francisco School of Needlework and Design (SNAD). It is conveniently located right on Union Square, and several nearby parking are listed on their website. I have not had the opportunity to visit this establishment in person as yet, but I have found ample eye candy and information on their site to keep me very entertained and intrigued.
Photo courtesy of SNAD: Lucy Barter teaching a class.

   SNAD is a non-profit business co-founded in 2015 by Lucy Barter and Ellice Sperber for the purpose of providing excellent educational opportunities in the needle arts to all levels of students and enthusiasts. SNAD's offering of hand embroidery workshops ranges from week long Stitch Retreats, to Comprehensive Studies courses, and even to specialized classes with guest teachers. They also have free Stitch-In sessions several times a week where you can bring your own projects to work on while visiting with fellow stitchers.
 
Photo courtesy of SNAD: Example of class work.
   One item that has piqued my interest is a rapidly approaching challenge called Make Do and Mend. SNAD has a gallery area in their space where current exhibits or challenges are displayed, and you can submit your entry by either sending your actual piece or a photograph of your work to be included in the challenge. 
   I thoroughly enjoyed seeing the photos presented of previous challenges, the wide selection of classes, and all of the beautiful embroidery work featured on this site.
   I can't wait to go there in person and maybe peruse their extensive library or take a class.